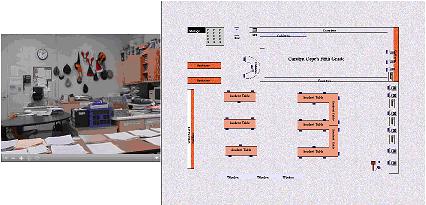
Using Virtual Reality for Classroom Design: An IntroductionIntroduction to VRThere are two major types of virtual reality: immersive and non-immersive. Using non-immersive techniques, your head holds still, and the keyboard and mouse are used to turn the virtual reality world in front of you. In contrast, immersive VR uses headsets with special goggles to create an artificial world whose view makes the user feel that they are in the space, such that turning your head to the left would cause the computer head-display to display the scene to your left. A QuickTime VR panorama and virtual reality worlds such as Second Life belong in the category of non-immersive VR. Immersive VR requires much more expensive technology, including goggles and VR gloves. The non-immersive panorama image below on the left is a VR image of an actual computer lab classroom, but graphic applications can be used to create a fictional space as well. The image on the right is an example. This discussion of this web page focuses on non-immersive VR panoramas and objects because they require no extra computer hardware to see them. Before creating a VR composition of your own, visit many of the examples below to understand better how this works.
The two above examples of Quicktime VR are the simplest form of VR imagery. This non-immersive form requires much less computer processing and data storage than other more sophisticated forms of immersive virtual reality. Faster computers and faster computer networks may eventually make some form of immersive VR the dominant form in the distant future. A VR panorama is an image that can be rotated in either direction for a full 360 degrees (or lesser rotations), and that allows the viewer to zoom in and out and up and down. Further, "hotspots" can be created within this panorama that become clickable looks to other information, including other panoramas, objects, web pages and more. Example hotspot designs are provided in the image areas above. To create a panorama, shots or photographs must be taken of all the space that is to be included in the panorama. The most affordable approach is to take a series of camera shots around a room or space rotating a still camera after each shot. There is a special way that this camera shooting must be done for it to be effective. Computer software then takes this series of photographs and seams the images together in one continuous image. Once Quicktime software is installed on your computer (it probably already is), then the image that is created can be viewed and controlled. Quicktime is one of many kinds of software used to build, and display and control three dimensional views. VR Literacy Begins with UnderstandingIt is important to look at many examples of a type of media to develop literacy knowledge about it. Understanding is a key part of literacy. One panorama is referred to as a VR node. A collection of VR nodes makes up a VR scene. Further, there are different features of these VR elements including:
It is equally important to look for examples that would be useful in your own teaching. One can do a Google Web search of "quicktime VR" OR "quicktime VR cube" gallery or Google Image search of "quicktime VR" OR "quicktime VR cube" gallery or use related terms along with content area terms to see many examples. For example, a search of "quicktime VR" OR "quicktime VR cube" gallery science search led to this panorama of "big science" physics research equipment. The term gallery is a common term to use in searches when it is possible there are collections of some type of things. Thousands of wonderful panorama examples can also be found at http://panoramas.dk/ that are useful in many content areas. Educational Uses of VRJust as realtors selling houses and architects selling building designs need to show three dimensional space, so do educators. In science, the three dimensional space might be used for in-depth views of atomic and molecular structures or used for understanding planetary orbits by moving among them. VR is just one of many tools used to enhance scientific visualization. Just as lawyers use VR and 3D models in legal reenactments and product simulations to illustrate to a judge, jury, or mediation board the facts of a legal argument, so students could use such models to make their points in presentations and other assignments. In social studies, virtual reality can provide in-depth looks at historical buildings and famous places, whether battlefields or the inside structures of different ways to socially organize space for the social activity of those who will live there (see Virtual Heritage) or it might simply show current views of the world (see EuroVR ). Spatial intelligence is also important to mathematical thinking. Both the creation and use of sculpture and virtual reality helps in developing a 3D sense of mathematical ideas transformation. Such work has application to industrial automation, inspection, space robotics and medicine. Psychologists use VR to help deal with phobias, for example, using ever more realistic VR views to help adjust those that are afraid of heights. Artists have extended this form of imagery to create new forms of expression, including the interactive games of desktop computers, Sony Playstations and more.Educators can also use VR panoramas for a number of further computer integration ideas. The online journal, VR in the Schools, from the Virtual Reality and Education Laboratory of East Carolina University has published several years of articles with further information on the rationale and means for using VR in school classrooms. Further, the ERIC database of educational literature shows over one hundred articles using "virtual reality" as a major descriptor. One quick and practical use is to create VR panoramas of classrooms to help compare and improve ways of organizing classrooms for instructional activity. The use of VR view is strengthened by also creating a two-dimensional view of the classroom layout. Creating with VR: Expensive Tools for Creating VR Panoramas with Professional QualityThe second part of literacy in a medium is being able to create something in it.
|
||||||||||
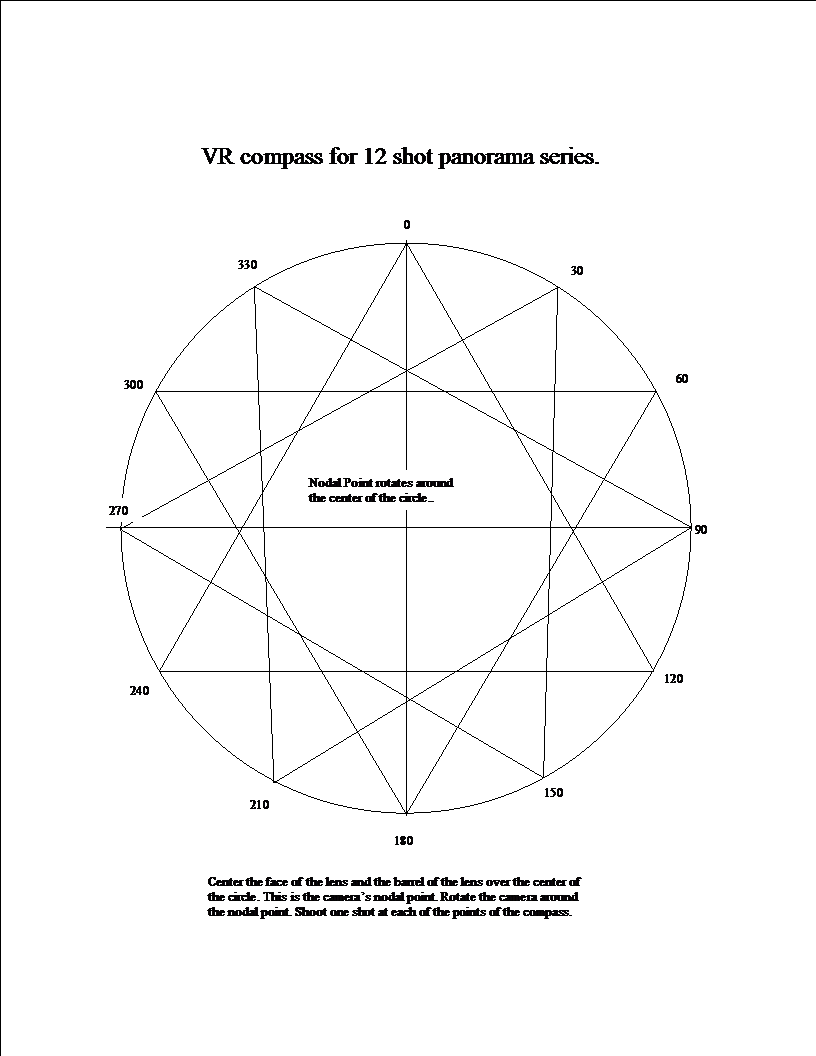
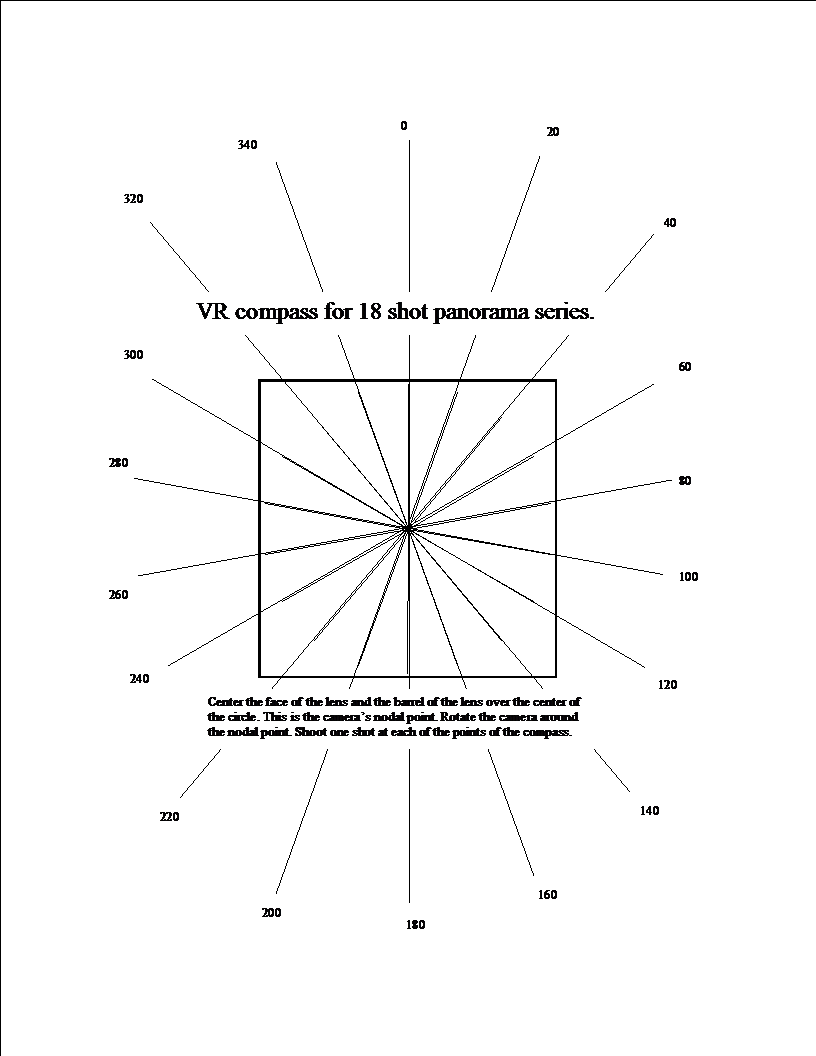
Low Cost VR Tools: Making a 360 degree panorama of a classroomCreating or composing VR can be done for free without any fancy equipment. This activity takes you throught the process of creating a panorama of a classroom space. While working through this process, record some ideas about panoramas that could be created that would be helpful in teaching relevant content areas. The procedure to make a VR panorama involves shooting a series of shots in a circle, using editing software to seam them together in one seamless image, then publishing them to a web page. This must be done in a very particular way.
2.
3.b. Every digital camera has a procedure for saving images in different sizes. The smaller the pixel size the more images that can be stored in the cameras memory. Change the pixel size setting on your digital camera to 320x240 if possible, but the larger 640x480 size is reasonable efficient. Anything larger than this may not only seriously slow down the editing process in dealing with such giant file sizes but may prevent the application software from having enough computer memory to complete the process. The final VR piece will be saved as 320x240 pixels anyhow, so capturing any more pixels in the digital camera is more than needed. One further check of picture file sizes will also provide important feedback. If the image files sizes are much larger that 600 kb, then the images will be too large for many panoramo applications to function. It is very common for current digital cameras to capture 1 megabyte to 10 megabytes for each image. If so, pick a much smaller pixel size before shooting. 4. Move the set of 12 or 18 shots to a floppy diskette putting them in a folder whose folder name is your first and last name. Select appropriate software. Confirmed working on Windows XP systems:
Works on Macs Confirmed working on Macs and Windows XP
Reported to work on Windows Vista
There are other applications as well. Panoguide's comparison page and Panoramas.dk point to many free, shareware, and commercial software programs that can be used for VR panoramas and other related creations such as VR objects and scenes.
Cool 360 PanoramasThough many VR applications are available, details for one application will be provided below. This applications works on Windows XP bu not Vista so other software may needed to be selected from the choices above depending the operating system that is available. Remember that once downloaded and installed, there are only 15 days to use the Cool 360 application before it will cease to work or it must be paid for which can be done by credit card. Start up the application. This process can take just a couple of minutes once it is understood. A narrated screen movie reviews how to use the Cool 360 application to make a 360 degree panorama from a folder full of photographs taken using the shooting procedures above. The text below also describes the same basic procedure as demonstrated in the movie for "stitching the images" together in Cool 360. 1. Three large numbers appear across the top of the screen, 1, 2 and 3. Clicking the step one button leads to dialog boxes that allow the folder off image files to be found, and its images to be loaded using the add all or add command as appropriate. 2. Once done, the step 2 adjust window appears. If the camera has been properly centered on the VR Compass and images shot at the correct angles, there is no need to do anything. The software will have correctly overlapped the images. However, if adjustments do need to be made, click somewhere with a image and a white edged border around the image will appear. Use the keyboard arrow keys to make some 1 pixel at a time moves. Use the mouse or the gold colored spheres around the image to move it left and right or up and down to better align it with the overlapping image underneath. 3. Once images are satisfactorily aligned, it is time for step three, save the file. Click the image of a diskette to save the file, putting it on the desktop of the computer or directly in the web stuff folder for the web account. If the software works fine until the last step and reports that it cannot create a Quicktime .mov file, it means the photographs were taken at too large a size and existing computer memory does not have enough space to complete final rendering. Either the photographs will have to be reshot in a smaller pixel size or the they will need to be rescaled in a separate application such as Microsoft's Paint application. Try 25% of the original size for each of the images. See this Paint movie for the rescaling (resizing) procedure: Determine or set an image's display size and file size (:23 ms; 270k). |
||||||||||
Embed the Panorama Movie in a Web PageAfter the VR panorama movie file has been created, return to these directions and follow the remaining steps below to place both the 360 panorama and the two dimensional drawing of your classroom side-by-side on the same web page, in the page titled Class Display Table. Also add it to the Unit View page. Two different approaches options are needed depending on whether your Web site is at a Web edited site like Google Sites, desktop application edited Web site edited by applications such as Netscape Composer, or other HTML Web page editor. 1. Upload the VR file to the File Cabinet at Google Sites. Open the file Unitview and link the panorama to it. 2. Pick one of the options below.
|
||||||||||
|
|
||||||||||
Summary and ReflectionsVirtual reality provides many options for educational application. The focus of this composition has been on applying VR to considerations of classroom designs. Study the completed views of your room. Further, as your classmates complete their panoramas, give their views a spin to study their classroom designs for features that you may wish to include in yours. Talk with them about the effectiveness and usefulness of their classroom layouts. Hopefully, seeing a wide variety of arrangements will increase the motivation to change classroom structure more often to meet changing instructional needs. Such work raises further questions. Is the blue zone in the red zone? What criteria should be used in determining the most effective classroom arrangements? Where should a computer go if there is only one in the classroom? If more than one, where should they go? If every student should have a computer, what kind of computers should a classroom have to work well with existing classroom space? How often during the year do teachers on average change their classroom layout in significant ways? Changing classroom layouts is time consuming and hard work. Is it valuable to growing minds to change the physical environment of the classroom more frequently than the average? From the viewpoint of mental stimulation, how often would be too often? To what degree do school administrators support classroom layout change through encouragement and through the promised assistance of physical plant staff? Click the Chapter Parent Frame button below to return
to further discussion of some of these questions. BibliographyVR in the Schools, a quarterly refereed publication of the Virtual Reality and Education Laboratory, distributed in both print and electronic versions. Farley, A.C. (1994). Altered Earth Arts. Retrieved January 8, 2001 from http://www.alteredearth.com/vr/cubicvr/shaft1.htm Moreno, Roxana; Mayer, Richard E. (2002). Learning Science in Virtual Reality Multimedia Environments: Role of Methods and Media, Journal of Educational Psychology, 94(3), 598-610. [EJ653379] No name (n.d.) Spatial Intelligence.. Retrieved November 11, 2003, from http://www.ul.ie/~mearsa/9519211/newpage2.htm Live SearchesShelves: Search the ERIC database for "spatial ability" or "computer simulation" and search by selecting major descriptor. Drives: Search Google.com for: "spatial intelligence" ; "spatial ability" ; "virtual reality".
Chapter Parent Frame | created March 3, 2002 | version 8.04 updated November 30, 2009| Page author: Houghton |
||||||||||

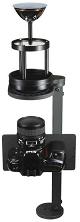

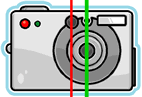 Learn what the nodal point of a camera means.
  VR shots must rotate
around the nodal point, the visual center of a camera, not it's physical center. In the camera pictures, green is the correct point around which to rotate the camera. Red is the wrong turning point. Do not rotate on a camera stand. In short, the nodal point of a camera is the center
of its lens, not the center of the body of the camera. It is also not the
front or back of the lens but near the middle of the lens where the
light rays come together and flip over. To create a panorama, the camera
must be rotated on this nodal point, NOT on the center of the camera body.
If further perspectives are needed on this concept, searching
with the right terms (
VR shots must rotate
around the nodal point, the visual center of a camera, not it's physical center. In the camera pictures, green is the correct point around which to rotate the camera. Red is the wrong turning point. Do not rotate on a camera stand. In short, the nodal point of a camera is the center
of its lens, not the center of the body of the camera. It is also not the
front or back of the lens but near the middle of the lens where the
light rays come together and flip over. To create a panorama, the camera
must be rotated on this nodal point, NOT on the center of the camera body.
If further perspectives are needed on this concept, searching
with the right terms (