Once the VR panorama movie file has been created, follow these remaining steps to place both the 360 panorama and the two dimensional drawing of your classroom on the same web page.
Embedding the Panorama Movie in a Web Page with Desktop Editor
13. Open the template file in Netscape Composer. Save the file to your diskette with the name classroom layout.html and then edit the page further. (Other desktop Web page editors would follow a similar process.)Once the VR panorama movie file has been created, follow these remaining steps to place both the 360 panorama and the two dimensional drawing of your classroom on the same web page.
The Left Side: The 3D View
14. Double click the yellow tab on the left of the Composer page and delete the old filename between the quotation marks and insert your own. [Note the rest of the code that is used to display a VR image in a web page. This is very similar to the code needed to display (e.g., embed) a movie into a web page.] Save the file.
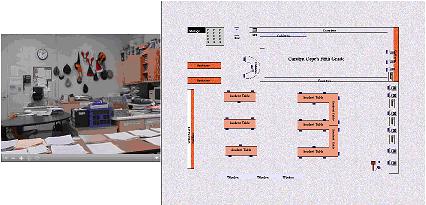
15.a. Double click the image area on the right of the page. Delete the old image filename and insert the small two-dimensional classroom image filename created in Microsoft Publisher or Appleworks/Clarisworks. This is the gif or jpeg file that should be about 300-400 pixels wide.
15.b. Click the image on the right once. Click the link editor and delete the old filename, inserting the large two-dimensional classroom image filename created in Microsoft Publisher or Appleworks/Clarisworks. Finally, save this html file one last time.
16. Next, make sure that html file and the panorama movie file and the two-dimensional classroom image file are all uploaded to your web site.
17. Link the html file to the appropriate place in section VIII of your unit plan. This means editing the link to classroom layout so that it goes to your new html file, deleting the old filename there.
18. Test all your links to determine that the panorama is controllable and that clicking the image on the right brings up a larger view of the same image.