 Next, start up the GIMP application. A series of floating windows may appear. There are many options but the immediate goal is to create an "image map" or set of hotspots that link to other web pages.
GIMP (Graphic Image Manipulation Program) is a free bitmap graphic editor that works across Mac, Windows and Linux platforms. One of its features is the ability to create hotspots (also called image maps). Though hotspot work can be done well with GIMP (which is similar to Photoshop), there are a wide variety of free graphic and photo editors are available for different platforms. A comparable vector driven program similar to Adobe Illustrator is Inkscape.
To use GIMP, download the GIMP application. There are many different versions of GIMP in circulation. In January, 2007 the current version is 2.2. The latest version can always be found at http://www.gimp.org/downloads/. However, a highly useful version is called GIMP Portable, because it can be kept on a USB or other portable drive and not have to be installed which enables users to run it on computers that do not allow users to install software or to users that simply choose to use it but not to install it. The download puts an installer version on the desktop which when run creates a folder that should be copied to a USB drive to make it portable. This version will never appear under the All Programs list on a Windows computer, requiring the user to always open the folder to find and run the application. The examples that will be given below are based on GIMP Portable.
For futher information, a tutorial on GIMP Image maps can be found at http://gimp-savvy.com/BOOK/index.html?node81.html. Also, a complete oneline book on the full range of GIMP features can be found at http://www.gimp.org/docs/.
First, see an example of a pond picture with hotspots, a frameset design that uses other web sites and local files. Explore it and complete the survey.
Next, start up the GIMP application. A series of floating windows may appear. There are many options but the immediate goal is to create an "image map" or set of hotspots that link to other web pages.
Focus on the window with the pull-down menu items. First click on File, then Open, then select the image that will be used to add the hotspots.
Next, click Filter, scroll to and click Web and select Image Map....
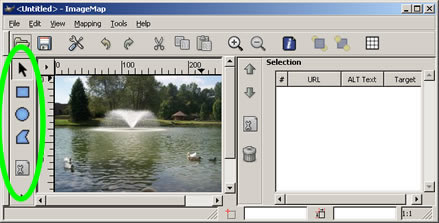 This screen has a series of hotspot tools along the left hand edge. Click and and then click and drag within the picture area to put the hotspot over the chosen region. The third shape, the Polgyon area, enables the hotspot to go around very irregular shapes. Once done moving the shape, double click. This double click opens a dialog box which waits for the web page or web site that to which the hotspot will be linked.
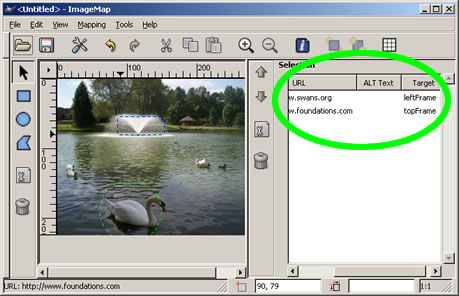 Once the OK is given to close the hotspot dialog box, the display will change to showing the local file name or web site address of the linked area on the right side of the window. It also shows the target's frame name.
Once the hotspots are finished, the final step is to save the file putting .htm or html at the end of the file name. This .html file and the image file are now partners that cannot function without each other. Both files must be moved together to the web site. The .html file remembers where on the image to go to find the hotspot, link and target information, but needs the image file so that the user can see what parts of the image are hotspots. For many reasons, keep the image file in the same folder as the image map web page.
Both the .html page which contains the image map of the hotspots and the image that will be the background for the hotspots must be put in the folder with the rest of the files used at the web site in the frame set. The web page (.html file) should be targeted or linked to appear when needed.
= = = = =
Page author: Bob Houghton