 ISTE NETS standards for this lesson include Teacher NETS: 1a &b.,2a & b. Student NETS: 1 a & b; 2a; 6a, b & d.
ISTE NETS standards for this lesson include Teacher NETS: 1a &b.,2a & b. Student NETS: 1 a & b; 2a; 6a, b & d.
One of the first steps in getting to know your students is learning their names, that is, connecting their faces (and personalities) with their names. There are numerous ways to build your class photo album and to help those you teach to learn a bit more about the digital world that is all around them. There is also no reason that this can't be fun, engaging and door-opening to later creative activity as well. Building engagement and motivation is a critical step in any teaching enterprise. Taking pictures of students can also be a sensitive topic in some schools so check on your school's Acceptable Use Policies for such activities before charging on ahead.
There are so many options for taking a digital photo that it can make just choosing complex. At the same time, there are still students and families that haven't crossed the digital divide and are without. A digital still camera is one of the cheapest and most effective single pieces of technology to have, teach about and share with a classroom of students. For example, Walmart and other stores have them in throwaway prices and upward. If students don't have their own, then just shoot a picture of the entire class. It is easy to digitally cut individual pictures out of a group shot to create a class seating chart if needed.
Other options for camera access include having students aim their cell phone cameras at themselves and then sending the pictures to your school email account. It is also increasingly hard to find or buy a laptop computer that does not come with a built-in camera, often called a webcam for its use in Web communication. Very inexpensive webcams can also be added to any computer, jacked in through the USB port. Check with your school media specialist or look in the computer lab and see if they have cameras on each one. If not at school, then survey the class about cameras for their home computers.
The rest of this lesson presumes that you have a computer with an attached webcam or built-in camera such as the new iMacs in our computer lab classroom. If so, then this is the quickest and easiest way to use Photo Booth-type software. The genre of "photo booth" software came about because Apple created a Mac-only application that ships free with Macs called Photo Booth that was a huge success. There were numerous copycat applications that followed such as Photobooth for Windows which is a free download and has some of the Mac versions features. Some of the best are actually online and useable across any computer system, Mac, Windows and Linux. Two online variants include Cameroid and Seenly which have a subset of Photo Booth's features. If your computer needs an attached camera, try Best Buy or Target stores for the GE EasyCam for under $20 or search online stores such as Froogle. New competitors constantly emerge so look around for other options also. Other online sites also provide for a range of morphing and image manipulation (MorphThing (faces), Morph Generator (any 2 imagees), Face Transformer (cross-cultural faces); and a list of other related sites.
Photo Booth will be used as a "best of class" application for demonstration purposes. The first step is finding the Photo Booth application. Mac applications not visible in the Dock at the bottom of the screen are available in the Applications folder. Click the hard drive symbol in the upper right hand corner of the screen and find and open the Applications folder. Scroll alphabetically to the Photo Booth application. Double-click on its icon to start it up.
Watch the 6 minute YouTube video below.
There are so many computer application tutorials available online that I try to make it a personal contest to find the youngest person who has not just accurately and ably taught about a computer application but has done so with creative flair. This way I can constantly demonstrate to myself just how capable and digitally literate our younger folk can be, if given the opportunity or the challenge to try. Can you find someone younger who's done as well or better in teaching about Photo Booth?
Your instructor may choose other options, but one option is to run Photo Booth when in class and create a snapshot of yourself. Use the designated email system to send your photo to your instructor. Don't use special effects. The goal is to make it easier for your instructor to connect names and faces.
But where is the image file stored once the Photo Booth application takes the snapshot? Back to the hard drive! Instead of opening the Applications folder, open the Users folder; find your name and open; and find the Pictures folder. In the pictures folder is the Photo Booth folder. File names in that folder aren't very revealing so use the "4 square" icon (bottom left) to show thumbnails of the pictures. When trying to attach the photo to an email, follow this folder sequence or drag a picture from the folder to the desktop to make it easier to find. It is always useful to know where applications store their files, but there is also a much faster way. Simply click and drag an image from the bottom slide tray onto the desktop; now its easily findable for dragging to a USB drive or uploading as an email attachment. It is always a good idea to change the file name by clicking on it to something that really matches the picture.
Equipment and software applications for creating student photos have many uses.
One option is to use the photo images to create a seating chart. 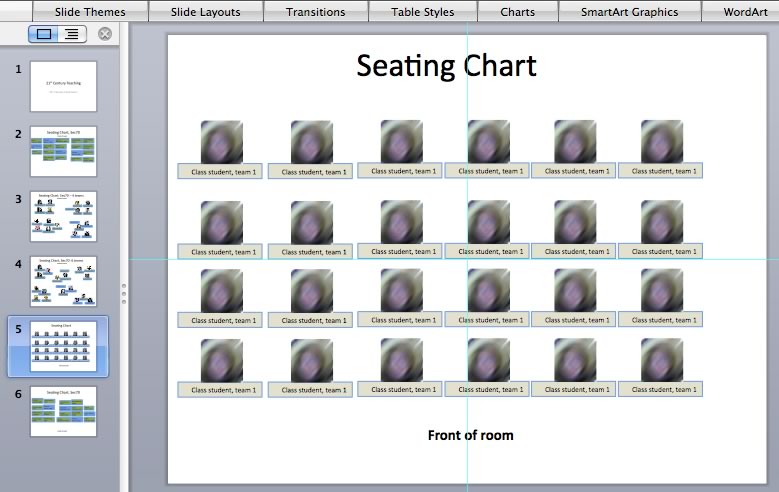 Use some application such as a word processor (e.g. Word), slideshow app (e.g., Powerpoint) or image editor (e.g., Pixlr.com, Publisher, Fireworks, etc.). Use a heading such as "front of the classroom" to help communicate the orientation of the seating chart so a substitute teacher can get a quick sense of whose sitting where. If using a slideshow app like Powerpoint, it is easy to duplicate the first seating chart slide, and then, like creating different football formations, drag student names/photos to new locations to create different arrangements for different subjects or different team projects or unit plans. See the example image on the left or click it for larger view. Either the photo seating chart or the images themselves in a folder can be used to learn student names. This digital seating chart set of skills has powerful application for classroom management uses.
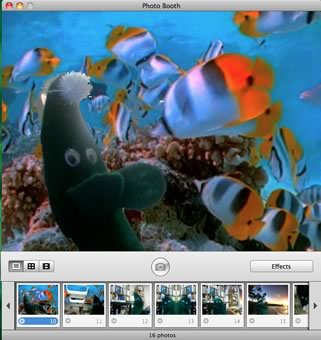
Photo Booth can also be used in so many ways to encourage creativity activities. For all content areas, the "green screen" type feature on the third set of special effects allows students to put themselves or puppets on location to tell a story or make a report. Note that Photo Booth is not just for still images, but rather has the movie button which records the in-motion backgrounds that come with each of the scenes.
These still and movie clips that come out of Photo Booth can be inserted into many other applications including video editors, Powerpoint slideshows, word processors, desktop publishing, Web pages, blog postings and more.
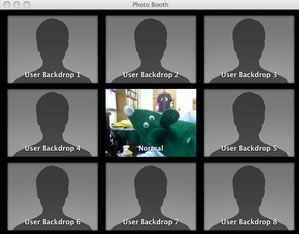 Explore the fourth special effect button and page. You are not limited to the background images that come with Photo Booth. Any still image, including images taken elsewhere from a scanner, camera or found on the Web can be brought into Photo Booth and used as backgrounds for whatever story or report needs to be made. Any Quicktime movie can also be used as a "live" or action background. To do so, click the Effects button on the right side bottom of the screen, then scroll through the effcts until you see a section that has blank spaces. See the image on the right. Look for the command that says User Backdrop 1-8. Use drag and drop to move the file from a folder or desktop into Photo Booth. Once the background has been inserted into the blank space, then double click on it to use it. That is, when doing a video report on Paris, put a photo from Paris in the background, just like the green screen background effects used by TV weather channel newscasters and other Hollywood special effects.
These lesson plans include Photo Booth within other activities and can easily be modified to use other versions of this genre of software. Let me know if you find others that are interesting.
More Photo Booth related lessson plans can be found searching "Photo Booth" and "lesson plans".
Created August 26, 2010 - version 1.09 - Updated August10, 2012 Houghton