How to Insert a YouTube Video into a Web page or Blog Posting
What if the video has been created as a computer file but is not yet on the YouTube site? Understand that YouTube is very public. Make a conscious choice about whether this is an appropriate place for the video, whether it placing it there is in conflict with any school or institutional regulations and look over YouTube's privacy options before proceeding. To upload your own video, create a YouTube account. With the account information, one can post to YouTube directly from the iMovie application under Share. Once the video is on the YouTube site, then come back and follow the steps below.
What if the video is already available on the YouTube site? If so, the process of inserting a YouTube video into a Web page or blog posting is easy and goes quickly. However, the title is a bit misleading as only the first frame of the video will actually appear in the web display. The video is really being linked in a way that clicking on it will call the video from the YouTube server and then appear on your Web page. Once clicked, it will begin to play within the current page at the designated location. Other video posting sites such as TeacherTube, or President Obama's speech site allow a similar procedure to be followed.
1. Find a video to share
Search YouTube or other appropriate video archive. A search of YouTube using the phrase "lesson plans" fractions led to a page which showed not only the video but provided a link to and the number of any other video by the author(s). In this case, the link led to hundreds of videos providing individualized instruction covering Pre-Algebra, Algebra 1, Geometry & Algebra 2 in a style as useful to students learning content as well as for teachers exploring different ways to teach the concept.
2. Copy the embed code
Once a particular video is found, play and review it. On the right side of the video is a rectangle containing some navigational elements. It looks like this screen capture on the right. The goal is to paste the embed code in your blog posting or web page. The heading shown circled in green identifies the area of the needed embed code. Copy the code in the area highlighted by the green rectangle, including any text not visible. Almost any form of click/drag in the code area will generally grab and highlight all of the text.
3. Insert the embed code
Some Web hosts like Google Sites provide specific tools for inserting video on a Web page. Other sites expect Web page composers to know how to open a web page editor like SeaMonkey Composer or a edit blog posting page.
If the editing is to done from a hard drive application, this requires the composer to position the insert cursor in the text editing area where the video should appear. Find the correct button or command and show the HTML code view. Blog posting and web page editors all have a way to show the HTML view of what is being composed. Paste in the YouTube embed code. In SeaMonkey Composer the HTML view tab is at the bottom of the window. Once pasted, the needed HTML code will look something like this:
Flip away from HTML view and finish any other needed composing.
4. Publish
A blog site editor will provide a button to Publish or Submit or Upload the blog posting. A web page editor will provide a way to save the file. Use the File Transfer Process (FTP) to move the file to the appropriate web account space.
Once the posting or uploading is completed, the above embedded code will find the video on the Internet and cause the first frame of the video to show within the web display. It then waits for a click within the video frame before playing the rest of the video that will stream from the YouTube video server. See the example below.
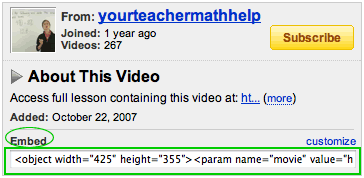 Once a particular video is found, play and review it. On the right side of the video is a rectangle containing some navigational elements. It looks like this screen capture on the right. The goal is to paste the embed code in your blog posting or web page. The heading shown circled in green identifies the area of the needed embed code. Copy the code in the area highlighted by the green rectangle, including any text not visible. Almost any form of click/drag in the code area will generally grab and highlight all of the text.