Motivate Reading and Writing:
Desktop Publishing
Many fascinating desktop publishing forms are available. 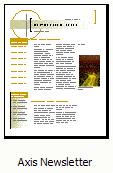 For now, create
a two page newsletter related to the theme of your unit plan project, with page
one containing two stories and page two holding various size pictures with
captions. While creating a teacher newsletter, consider how a class of students
might be organized to create a similar student newsletter on a regular basis to
reinforce topics that are taught. The best way to master newsletters and understand their value for stimulating
reading and writing is to make one.
For now, create
a two page newsletter related to the theme of your unit plan project, with page
one containing two stories and page two holding various size pictures with
captions. While creating a teacher newsletter, consider how a class of students
might be organized to create a similar student newsletter on a regular basis to
reinforce topics that are taught. The best way to master newsletters and understand their value for stimulating
reading and writing is to make one.
This page will use what you have learned above about desktop
publishing and newsletters
in the desktop publishing tutorial and guide you through the process of making a two page newsletter
of your
own using Microsoft
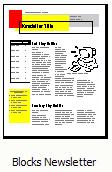 Publisher or Appleworks. To see a full size example of a
page layout, click the Blocks Newsletter symbol on the right (199kb).
Publisher or Appleworks. To see a full size example of a
page layout, click the Blocks Newsletter symbol on the right (199kb).
The newsletter that is
created will be for the students that
will experience
your unit plan and for their parents. Before going further, print out
the
grading rubric for the newsletter and keep its guidance in mind as
the activity is completed.
Newsletter Requirements
Learn Desktop Publishing. Tutorials for multiple applications that can
quickly create newsletter templates are provided in the desktop publishing
tutorial. Microsoft Publisher
has the most power features and will be used for in-class instruction. If you are a Western student and do not have this application, you can down the Microsoft applications for free (your tuition paid for it), including Microsoft Publisher. Use WCU's Microsoft Office Download page to get the application(s) and use the IT Help line if needed.
The
fastest of the three applications for making a newsletter is the Appleworks Assistant feature for
Newsletters (Macintosh only). Microsoft Word is most common application that can handle some of this work
but it often gives problems in positioning images and text and does not give you experience with a "draw" application so I do not want Word used for this assignment. There may be other desktop publishing applications that you own that could also do an excellent
job with the assignment and you are welcome to use them, but if your instructor
does not have the software that you choose to use, it is hard to help if
you have problems with it.
Page One
 Title. Title your newsletter and newsletter file in some way appropriate to your Unit
Plan. Find an appropriate place to put your name as editor of the newsletter.
Title. Title your newsletter and newsletter file in some way appropriate to your Unit
Plan. Find an appropriate place to put your name as editor of the newsletter.
Editor's Composition. The lead story is the Editor's or Teacher's section, which is
also a good place to put your picture. In this section, provide an overview of
your unit plan, a piece which needs to meet several criteria. First, if
this section was read out loud it should take very close to a minute and a half
or be
around 200-225 words. The time limit is important because the piece that you write here
will later be expanded to become the script that will be used when you shoot your video presentation
of your unit plan in a later chapter that will be two minutes long. Second,
in this chapter you have been asked to think visually. Work on a visual sense of
writing as you compose this set of around 225 words or longer if it fits in the
lead story space. Have a series of images or pictures in mind of what you
will be doing or showing on camera while you introduce your unit plan. One of
the great advantages of still image and video cameras is that through your media
you can bring your students to places that you cannot easily take them to when
you are in the classroom. Because you will be using a digital video camera, for
part of your video you will go "on location" to help illustrate your ideas. Keep
this in mind as you compose your text.What does it mean to write an overview? By writing an overview of your unit
plan, you write about the highlights of the learning experiences that you are
planning. You could think of it as an advertisement that
will get the students' attention and build motivation. Cover key ideas of what the learners will
enjoy about this study, and mention something of what state curriculum goals it
will satisfy. This could be done in straight forward expository style or in some
dramatic or theatrical fashion. Be
sure and mention some aspect of how computer technology will be included in the
unit. Experiment. Be creative. Have fun.
Unit Plan Overview Examples.
Need  some "story starters"
ideas for a unit plan overview L? To hear
some actual examples of the video version of the script, try these approximately
two minute videoclips:
A Study of
Sound, 2nd grade, Roxana Robles-Cox ;
Nutritional Math, 7th grade, Jamie Sitton ;
Japan, 3rd grade, Carol Honeycutt;
Smashin' the Fraction Fear, 5th, Carolyn Cope; Eric
Carle, kindergarten; Stacie Carter. Close your eyes and listen carefully to
the content of the script. The form of expression will change only slightly for newsletter use, and the
content elements would be the same.These videoclips will take a while to play over dial-up connections as
they are a couple of megabytes in size, so plan something else to do (like read
chapter web pages) while the movie data is transferring. Those on campus will
have them playing in seconds. Those with broadband connections off campus such
as cable modems and DSL will have them playing in minutes depending on your
network traffic.
some "story starters"
ideas for a unit plan overview L? To hear
some actual examples of the video version of the script, try these approximately
two minute videoclips:
A Study of
Sound, 2nd grade, Roxana Robles-Cox ;
Nutritional Math, 7th grade, Jamie Sitton ;
Japan, 3rd grade, Carol Honeycutt;
Smashin' the Fraction Fear, 5th, Carolyn Cope; Eric
Carle, kindergarten; Stacie Carter. Close your eyes and listen carefully to
the content of the script. The form of expression will change only slightly for newsletter use, and the
content elements would be the same.These videoclips will take a while to play over dial-up connections as
they are a couple of megabytes in size, so plan something else to do (like read
chapter web pages) while the movie data is transferring. Those on campus will
have them playing in seconds. Those with broadband connections off campus such
as cable modems and DSL will have them playing in minutes depending on your
network traffic.
Create or find copy. Create, invent or find other unit plan related
stories to complete the second story space of page one in the newsletter. These can be examples of student writing that you make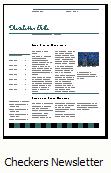 up at
this time and teacher comments about things to bring from home. Also, use as much as you can of the data that you have collected from work in
other chapters so far for your unit plan. That is, use the search system
pages introduced in the beginning of this week's lesson to find further
information for your newsletter. In this way you will have to invent as
little as possible. That is, open your notes files and web pages and copy
data to the newsletter. (You will notice when you copy to the newsletter
that you may have many carriage returns at the end of lines that must be
deleted for your information to display properly.) If you need more information
to fill your empty spaces in the newsletter, use the top down search strategy
you were taught this week and go back to the Virtual Library page, and
hunt for more. Always properly cite your sources at the bottom of a
picture or the end of an article that uses data from some other source of information such as
Encyclopedia, book or web page. Include the web address if story data comes from
there to encourage readers to go further in their reading.
up at
this time and teacher comments about things to bring from home. Also, use as much as you can of the data that you have collected from work in
other chapters so far for your unit plan. That is, use the search system
pages introduced in the beginning of this week's lesson to find further
information for your newsletter. In this way you will have to invent as
little as possible. That is, open your notes files and web pages and copy
data to the newsletter. (You will notice when you copy to the newsletter
that you may have many carriage returns at the end of lines that must be
deleted for your information to display properly.) If you need more information
to fill your empty spaces in the newsletter, use the top down search strategy
you were taught this week and go back to the Virtual Library page, and
hunt for more. Always properly cite your sources at the bottom of a
picture or the end of an article that uses data from some other source of information such as
Encyclopedia, book or web page. Include the web address if story data comes from
there to encourage readers to go further in their reading.
Does properly citing your source mean using a formal citation such as APA? There is the spirit of the law and the letter of the law. That concept applies to citation as well. The spirit of citation is that someone can get back to the original source to look for further inspiration and fact-check as well. The audience for this newsletter is not the formal academic education audience whose format requires APA citation. You would not see APA citation in the New York Times or a Newsweek magazine article either, but sources are cited in such as a way that you know when information is not the author’s ideas and where to go if checking the source was needed. If you give the book and author, the encyclopedia or web page address you have met the spirit of citation and the needs of your audience. So, no, there is no requirement for APA
citation for a newsletter, or at least for this newsletter. Other faculty might
set other standards so it is appropriate to check when such questions arise.
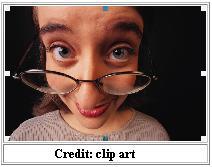
First Image- A Mugshot. To obtain an image of yourself
 to insert in
your newsletter, first complete the desktop publishing
tutorial then use a digital still camera, scanner or video camcorder. You need a close-up shot
of yourself, so close up that your face generally fills the frame. If the photo
includes the shoulders then dress needs to be teacher dress code. It does not
to insert in
your newsletter, first complete the desktop publishing
tutorial then use a digital still camera, scanner or video camcorder. You need a close-up shot
of yourself, so close up that your face generally fills the frame. If the photo
includes the shoulders then dress needs to be teacher dress code. It does not
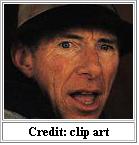 have to be in a classroom, outside scenes provide great lighting. I don't want
to see party pictures or prom formal dresses, nor the frozen wax statue look
against a plain wall; be dynamic and expressive; at least smile! Notice
how the darker background around these example faces makes the face colors come
through more emphatically. Though
the image might seem shockingly large at first, once it is inserted into the newsletter and scaled to the page, you may barely be visible if your image does
not fill the frame. Work with classmates and/or ask lab assistants to help you
move this image from your camera to the computer. Save this image to a
newsletter folder. Use the Insert
command to put your image in the newsletter in your lead story. Once inserted,
move the image to the needed location and scale to fit.
have to be in a classroom, outside scenes provide great lighting. I don't want
to see party pictures or prom formal dresses, nor the frozen wax statue look
against a plain wall; be dynamic and expressive; at least smile! Notice
how the darker background around these example faces makes the face colors come
through more emphatically. Though
the image might seem shockingly large at first, once it is inserted into the newsletter and scaled to the page, you may barely be visible if your image does
not fill the frame. Work with classmates and/or ask lab assistants to help you
move this image from your camera to the computer. Save this image to a
newsletter folder. Use the Insert
command to put your image in the newsletter in your lead story. Once inserted,
move the image to the needed location and scale to fit.
Page Two
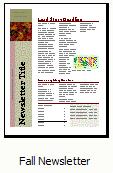
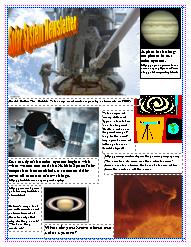
Page two should accent a strategic approach to im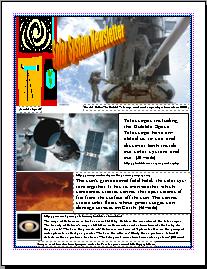 age-text
sequencing, a graduated sequencing. Sequence the picture size from bigger to
smaller and text from small amount to larger amounts, including a step-by-step
shrinking of the font size and white space. Think of how National Geographic or Time Magazine
introduces a major story, starting out with a larger picture with small amounts
of text then decreasing picture size and increasing text caption space with each
picture. Use a similar approach on page two as in the example on the left. The
example on the right merely flips text and picture to create more display
variety. It is also useful to see a "bad example" that has too many images and
lacks graduated
age-text
sequencing, a graduated sequencing. Sequence the picture size from bigger to
smaller and text from small amount to larger amounts, including a step-by-step
shrinking of the font size and white space. Think of how National Geographic or Time Magazine
introduces a major story, starting out with a larger picture with small amounts
of text then decreasing picture size and increasing text caption space with each
picture. Use a similar approach on page two as in the example on the left. The
example on the right merely flips text and picture to create more display
variety. It is also useful to see a "bad example" that has too many images and
lacks graduated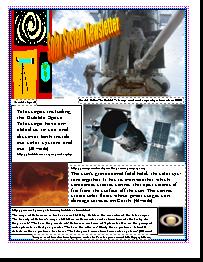 media sequencing: thumbnail;
full size.
media sequencing: thumbnail;
full size.
Use the newsletter title created for page one and repeat it on page two. (Click
the picture to see a full size view.) This
can simply be inserted at the top or placed artfully over the top of a picture,
but make sure the text is of a color to show up when it prints in black and
white.
Click the picture of the page on the left to see it full size. It should also be
possible to use page two as the introductory page, just done with images instead
of text.
Use your digital camera to shoot multiple pictures related to your unit plan
where possible. That is, the ideal focus is on original work created by the
editor/learner. Only use clipart or web pictures if you cannot shoot something
similar yourself. Pictures and photographs can also be created and/or edited
using paint or drawing programs such as the commercial
applications of Appleworks Draw, Appleworks Paint, Microsoft Paint, Photoshop,
Publisher or the free to download and to use graphics applications such as
GIMP, Inkscape,
Scribus,
Blender, and others. The desktop publishing tutorial in this chapter
not only provides advice on composing the shoot of a photograph, it also provides details on using Microsoft Paint
to crop and scale images, an application which is in the the Accessories folder
of all Windows computers.
To clear page two of the default story boxes, when on page two use the Select All
command under
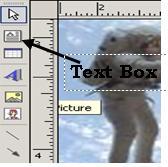 Edit in the menu bar and
then Delete to clear the page of story templates. Next, Insert a picture then create
a text box next to the picture and add the appropriate caption text. Does “appropriately labeled” mean cited, captioned, or both? All
pictures next a caption, explanatory text, no matter how short. Credit for the
picture can be put in an 8 point font. If you own the copyright, put your name
after the word credit (e.g., Credit: Bob Houghton). If you do not own copyright,
if credit is not going to you for the images(s), then a phrase will needed to be
added at the bottom of page two saying "copyright images used for educational
purposes under the Fair Use Provision of the U.S. Copyright law". Further, more
text space will be needed in the caption area of each picture to show the web
address that provided the picture or the author, book or magazine and page
number from which the picture was scanned.
Edit in the menu bar and
then Delete to clear the page of story templates. Next, Insert a picture then create
a text box next to the picture and add the appropriate caption text. Does “appropriately labeled” mean cited, captioned, or both? All
pictures next a caption, explanatory text, no matter how short. Credit for the
picture can be put in an 8 point font. If you own the copyright, put your name
after the word credit (e.g., Credit: Bob Houghton). If you do not own copyright,
if credit is not going to you for the images(s), then a phrase will needed to be
added at the bottom of page two saying "copyright images used for educational
purposes under the Fair Use Provision of the U.S. Copyright law". Further, more
text space will be needed in the caption area of each picture to show the web
address that provided the picture or the author, book or magazine and page
number from which the picture was scanned.
Turning In the Newsletter Assignment
If the class meets in an on-campus class meetings, print out the two
pages of the newsletter. Make the grading rubric the cover letter for the newsletter. It does not have to be a color printout. Analyze your
own work and use the grading rubric to circle the grade that you believe it has earned. If you are a distance education student, send the Microsoft Publisher file to me as an email attachment. If the attachment does not come through, I will call you and suggest another online way to handle it. The file will be much larger than standard word processing documents and will take a while to transmit
and might be larger than your email account space.
Continue to keep organized though the use of folders on your
disks. Create a folder called newsletter that will hold the Microsoft Publisher file
and also contain
any other word processing documents and the images used and/or
collected but not used for the newsletter.
Collaboration, Networking Skills and Desktop Publishing
Newsletters are just one example of great team or collaborative activities, allowing the creation of
a rotating army of jobs, including editor in chief, multiple reviewers for each
writing format; writers, researcher-fact checkers, photographers, graphic
artists and layout editors that insert images and text into the publication
design.
Such projects also provide real need to pass information among team members
electronically too. Networking is very valuable to newsletter editors that are
organizing the work of other writers. Files for newsletters frequently grow
quite large in size as images are added to the text. It is not unusual in the
commercial world for a file to be larger than the space available on the floppy
diskettes still in use in schools.
There are other solutions for working around the small storage size
of diskettes. One approach is to send files to the editor-in-chief
as email attachments. Other approaches use Local area networks (LANs) and wide area networks (WANs)
to move the files among a team of writers, designers
and producers, so that different people can enhance an image or an article.
In schools such teams consist of students, teachers/administrators and
secretaries. The storage space needs of this assignment may require an entire
USB drive or other storage system. The wiki systems explored in an earlier
chapter also make it easy to create an online page with only authorized
reviewers and writers. Once approved by reviewers and the editor-in-chief, then
the layout editor can insert it into the newsletter design.
Do not let
desktop publishing activity
 stop
at just newsletters. Microsoft Publisher and other desktop publishing
applications provides templates for a wide range of stimulating alternative
writing and visual activities for which both images and text are needed. These
are great for writing centers and other writing needs. Other formats include:
stop
at just newsletters. Microsoft Publisher and other desktop publishing
applications provides templates for a wide range of stimulating alternative
writing and visual activities for which both images and text are needed. These
are great for writing centers and other writing needs. Other formats include:
 brochures
(see picture on left), flyers, signs, postcards, invitation cards, greeting
cards, business cards, resumes, letterheads, banners, calendars, advertisements,
award certificates, menus, and even airplanes and origami on which text messages
can be placed.
brochures
(see picture on left), flyers, signs, postcards, invitation cards, greeting
cards, business cards, resumes, letterheads, banners, calendars, advertisements,
award certificates, menus, and even airplanes and origami on which text messages
can be placed.
Many of these are activities which require smaller amounts of text (see business card on
right) which better fit writers who are challenged to see the value of any kind
of composition. For example, buy some business-card printer stock, and hold a
class business convention so students can share the business cards they designed
along with sharing their entrepreneurial ideas and
sharing their company brochures. These writing forms are useful to
all content areas. They are as applicable to science, math and social studies
teaching at any age level as they are to language arts classrooms.
are activities which require smaller amounts of text (see business card on
right) which better fit writers who are challenged to see the value of any kind
of composition. For example, buy some business-card printer stock, and hold a
class business convention so students can share the business cards they designed
along with sharing their entrepreneurial ideas and
sharing their company brochures. These writing forms are useful to
all content areas. They are as applicable to science, math and social studies
teaching at any age level as they are to language arts classrooms.
Plan
to use and display all these types around the classroom and hall over the
teaching year.
Chapter Five Home Page | Updated
February 27, 2007, 8:52 p.m. | Page author: Houghton